Tuesday, April 7, 2020

Faber Family Seder - April 8, 2020 - Lou Person


Link to Haggadah: https://faberseder.s3.amazonaws.com/haggadah.pdf

Click to join the meeting (includes video):

If you have trouble, you can always dial in (but we hope to see everyone):
United States Toll-Free: +1 855-552-4463
Meeting ID: 5059 94 6588

TIP 1: Installing the client would make for a better experience (but is not required): https://aws.amazon.com/chime/download-chime/
TIP 2: There will be a chat window so you can message the entire group or have side chats with other family members.
 
Wed, April 8th, 6PM EST / 3PM PST

6:00-6:15EST (3:00-3:15PST) Hello!
6:15-6:30EST (3:15-3:30PST) Recognize family members for recent “good deeds” and open up to anyone that wants to share positive thoughts
6:30-7:00EST (3:30-4:00PST) Mini Seder 
7:00EST (4PST) Goodbye! Or stay on to socialize while bridge remains open.
Starting at 6:15, we’ll acknowledge family members for “good deeds” during these trying times.
 

Sunday, June 23, 2019

Dual Color LED on Rasberry Pi - Lou Person - STEM - Girls Who Code

Go to page 28 of the manual http://gwc.daisyware.com/manual.pdf which will discuss what the Dual-Color LED does.
When you are done, the project will look like this:


First, since this is the first project, you will need to connect the ribbon cable to the Rasberry Pi and the T-Cobbler.  Reference the manual page 10.  See 38 Breadboard, 39 T-Cobber and 40 40-pin Ribbon Cable for T-Cobbler.  Be very careful you don't bend the pins in the T-Cobbler.  Also, be very careful of the Ribbon Cable, the ribbon is a bunch of 40 cables attached together, if you bend the ribbon, you could break one of the small cables.


Second, connect the Cobbler to the Rasberry Pi using the Ribbon, as shown below.  Make sure the first row of pins on the Cobbler lines up to the first row on the top of the Breadboard.  Don't bend the pins!


Fourth, now wire the project.  Page 29 will show how the wiring should be done. Note that the diagram shows a purple, green and black wire.  Our kit includes a 3 pin anti-reverse cable which is yellow, red and black.  So, the picture on page 29, the purple wire illustrated is the yellow wire in reality, the green wire illustrated is the red wire in reality and the black wire illustrated (grd) is the black wire in reality.  Page 29 will show how it should be wired (see below).  Note that there is an R, G and GND on the sensor.  The yellow wire will connect to GPIO17.  Take the pin of the yellow wire and insert it into the left hole in the GPI017 row.  The red wire will connect to GPIO18.  Thake the pin of the red wire and insert it into the right hole in the GPIO18 row.  The black wire will connect into the third group along the right edge, top right most hole as shown below.  Finally, connect the 4 wires as shown exactly below in the picture, also described here:
1) The top most, right most hole should have a black wire which connects to the right (second) hole in the gnd row.
2) The top most, second from right most hole, should have a red wire which connects to the right (second) hole on the 5V0 row.
3) The top most, left most hole should have a red wire which connects to the left (second) hole in the 3V3 row.
4) The top most, second from left most hole, should have a black wire which connects to the left (second) hole in the GND row.


Here is what is should look like when done (page 31) (note the gnd wire is not shown per instructions below and a white wire was used instead of a red).


Fifth, run the code and flash your light!
On the bottom of page 29 of the manual, under "For Python Users", enter the two commands.
First, enter this command and hit enter:
cd /home/pi/SunFounder_SensorKit_for_RPi2/Python/
Second, enter this command and hit enter making your LED flash
sudo python 01_dule_color_led.py

By Lou Person


Install Sensor libraries on Rasberry Pi - Lou Person - STEM - Girls Who Code


In this post, we will install the libraries (blocks of software code) that you will reference in the python code in the lessons later.  You should have received a copy of "Sensor Kit V2.0 for Rasberry Pi B+".  If you don't have it, or want to read it online, please go here: http://gwc.daisyware.com/manual.pdf We will refer to this as "the manual" from now on.

First, open a terminal on the Rasberry Pi to install the libraries.  Go to page 13 of the manual to see "How to Open a Terminal".  Stop on the bottom of Page 16, we will use Putty later.

Second, go to page 23 of the manual to "Install Libraries".  You will install Wiring Pi.  We will be using GitHub and Linux commands to install libraries.  It's easy, don't worry!
Read step 1, you will enter this command: git clone git://git.drogon.net/wiringPi
Read step 2, you will enter these commands.  Type (or copy and paste) these command one at a time, pressing enter each time, the manual will provide more details:
cd wiringPi 
git pull origin 
./build 
Read step 3 and run the tests.

Third, go to page 25 and look at Method 2.
Change directory to /home/pi by typing this command and pressing enter:
cd /home/pi/ 
Now that you are in this directory, download the code from GitHub.  Type (or copy and paste) the command below and hit enter after:
git clone https://github.com/sunfounder/SunFounder_SensorKit_for_RPi2 

Now that everything is installed, you are going to wire your first sensor and run the python program you just installed to make the LED turn different colors!


Tuesday, June 18, 2019

Setting up Rasberry Pi - Lou Person - STEM - Girls Who Code


Thanks to Girls Who Code for the grant, we were able to purchase the following Rasberry Pi 3 with Sensor kit from Stack Social: https://stacksocial.com/sales/37-sensors-starter-kit-for-raspberry-pi-pi-3b-included-2

If you want to follow these posts, you can order the same one.

As of this blog post, we are using the most current model, which is Raspberry Pi 3 Model B+

When you open the box, be careful to remove just the Rasberry Pi in the small box.  It comes with a small Micro SD Card so be careful you find it right away.

STEP 1:
Follow along here: https://projects.raspberrypi.org/en/projects/raspberry-pi-setting-up/2  This guide explains the cable you will need to connect to a monitor, a USB Keyboard and USB Mouse.  Also, a power cord is needed.  You can use a USB Cable with a square power adapter for the wall.  You will need a micro USB cable such as this one: https://www.amazon.com/dp/B0711PVX6Z/ref=cm_sw_em_r_mt_dp_U_KOycDbH61B4PQ

STEP 2:
Next, follow along here to setup the SD RAM Card (these were setup for you if you are in the club.  If you are in the club, you can skip this step): 
The tricky part here for me was the SD Card is a Micro SD format.  I had to get an adapter so I could insert it into a SD Reader on my computer.  You can also get a USB Adapter if you only have USB ports.  
Here is an adapter for USB, this is what most of you will need:

Here is the adapter I got so it would fit into the SD Reader slot on my computer: 

Continue following the instructions for downloading NOOBS, Formatting the SD Card, Extracting and Copying the files to the SD Card.  https://projects.raspberrypi.org/en/projects/raspberry-pi-setting-up/3

STEP 3:
Now that you have the files copied to the SD Card, insert it into the Rasberry Pi and install the Mouse, Keyboard, Power and Monitor:

STEP 4:


In the next lesson, we will connect the sensor board, install the libraries, install the python code and program a LED to change colors!


Saturday, June 1, 2019

Girls Who Code Weather Station - Lou Person - STEM - Python - AWS

In this lesson we are going to build a weather station.  The project will consist of a simple web form that takes as input the name of the city.  It will then pass it to a script which will take the name of the city and lookup the weather for that city.  We will use an API (Application Programming Interface) from OpenWeatherMap.org in our script to get the Weather data.  An API is a secure way to access a programming, securely, that exists somewhere else and was written by someone else.  An API is a way to pass input and get output from a program written by another person or team.

First, create an html form and save it in the html folder through FTP.  Name it formweatheryourname.html (don't forget to change yourname to what your name really is).  Also, don't forget to change the name of the script to formweatheryourname.py in the same way.

Here is the form:
<form action="/cgi-bin/formweatherlou.py" method="post">
    City: <input type="text" name="city">
    <input type="submit" value="go">
    </form>

Next, change to the cgi-bin folder.  Create the formweatheryourname.py script (change the name to your name).  Here is the code:

#!/bin/python
#import modules to use API
import requests, json
# Import modules for CGI handling
import cgi, cgitb
# Required header that tells the browser how to render the text.
print("Content-Type: text/plain\n\n")  # here text -- not html

# Python program to find current
# weather details of any city
# using openweathermap api

# import required modules
import requests, json
form = cgi.FieldStorage()
city_name = form.getvalue('city')

# Enter your API key here
api_key = "868114e4f2aef8df7211bc655077f6ee"

# base_url variable to store url
base_url = "http://api.openweathermap.org/data/2.5/weather?"

# Give city name
#city_name = input("Enter city name : ")
#city_name = "Delhi"

# complete_url variable to store
# complete url address
complete_url = base_url + "appid=" + api_key + "&q=" + city_name

# get method of requests module
# return response object
response = requests.get(complete_url)

# json method of response object
# convert json format data into
# python format data
x = response.json()

# Now x contains list of nested dictionaries
# Check the value of "cod" key is equal to
# "404", means city is found otherwise,
# city is not found
if x["cod"] != "404":

    # store the value of "main"
    # key in variable y
    y = x["main"]

    # store the value corresponding
    # to the "temp" key of y
    current_temperature = y["temp"]

    # store the value corresponding
    # to the "pressure" key of y
    current_pressure = y["pressure"]

    # store the value corresponding
    # to the "humidity" key of y
    current_humidiy = y["humidity"]

    # store the value of "weather"
    # key in variable z
    z = x["weather"]

    # store the value corresponding
    # to the "description" key at
    # the 0th index of z
    weather_description = z[0]["description"]

    # print following values
    print(" Temperature (in kelvin unit) = " +
                    str(current_temperature) +
          "\n atmospheric pressure (in hPa unit) = " +
                    str(current_pressure) +
          "\n humidity (in percentage) = " +
                    str(current_humidiy) +
          "\n description = " +
                    str(weather_description))

else:
    print(" City Not Found ")


Girls Who Code Weather Station - by Lou Person - STEM - Python - AWS

In this lesson we are going to build a weather station.  The project will consist of a simple web form that takes as input the name of the city.  It will then pass it to a script which will take the name of the city and lookup the weather for that city.  We will use an API (Application Programming Interface) from OpenWeatherMap.org in our script to get the Weather data.  An API is a secure way to access a programming, securely, that exists somewhere else and was written by someone else.  An API is a way to pass input and get output from a program written by another person or team.

First, create an html form and save it in the html folder through FTP.  Name it formweatheryourname.html (don't forget to change yourname to what your name really is).  Also, don't forget to change the name of the script to formweatheryourname.py in the same way.

Here is the form:
<form action="/cgi-bin/formweatherlou.py" method="post">
    City: <input type="text" name="city">
    </form>

Next, change to the cgi-bin folder.  Create the formweatheryourname.py script (change the name to your name).  Here is the code:

#!/bin/python
#import modules to use API
import requests, json
# Import modules for CGI handling
import cgi, cgitb
# Required header that tells the browser how to render the text.
print("Content-Type: text/plain\n\n")  # here text -- not html

# Python program to find current
# weather details of any city
# using openweathermap api

# import required modules
import requests, json
form = cgi.FieldStorage()
city_name = form.getvalue('city')

# Enter your API key here
api_key = "868114e4f2aef8df7211bc655077f6ee"

# base_url variable to store url
base_url = "http://api.openweathermap.org/data/2.5/weather?"

# Give city name
#city_name = input("Enter city name : ")
#city_name = "Delhi"

# complete_url variable to store
# complete url address
complete_url = base_url + "appid=" + api_key + "&q=" + city_name

# get method of requests module
# return response object
response = requests.get(complete_url)

# json method of response object
# convert json format data into
# python format data
x = response.json()

# Now x contains list of nested dictionaries
# Check the value of "cod" key is equal to
# "404", means city is found otherwise,
# city is not found
if x["cod"] != "404":

    # store the value of "main"
    # key in variable y
    y = x["main"]

    # store the value corresponding
    # to the "temp" key of y
    current_temperature = y["temp"]

    # store the value corresponding
    # to the "pressure" key of y
    current_pressure = y["pressure"]

    # store the value corresponding
    # to the "humidity" key of y
    current_humidiy = y["humidity"]

    # store the value of "weather"
    # key in variable z
    z = x["weather"]

    # store the value corresponding
    # to the "description" key at
    # the 0th index of z
    weather_description = z[0]["description"]

    # print following values
    print(" Temperature (in kelvin unit) = " +
                    str(current_temperature) +
          "\n atmospheric pressure (in hPa unit) = " +
                    str(current_pressure) +
          "\n humidity (in percentage) = " +
                    str(current_humidiy) +
          "\n description = " +
                    str(weather_description))

else:
    print(" City Not Found ")


Saturday, May 4, 2019

Girls Who Code For Loop by Lou Person

The for loop is code that will loop through a site of numbers or characters.  Starting with the last program you created last ( http://blog.louperson.com/2019/04/lou-person-stem-girls-who-code-select.html ), add the following code to the program and upload it to the cgi-bin directory:

for x in range(10):
    print(x)

What happens after you process the form that calls this program? 

Next, after you print x, print a <br> so each number prints on a different line.

When you are done with that, work with a partner to build an IF statement to determine if the number is even or odd and print even or odd next to the number.

Hint: You'll want to use the % operator (which is not division, it is called the modulo operator % which will return 0 if even and 1 if odd.

Why are you modulo by 2?

Here is information on operators: https://www.w3schools.com/python/python_operators.asp

Here is a hint:

if x % 2 == 0:                  
        print("even")           
if x % 2 == 1:              
        print("odd")

Also, experiment with the for loop, here is more information: https://www.w3schools.com/python/python_for_loops.asp

Saturday, April 27, 2019

Lou Person STEM Girls Who Code Select and Decide

In this lesson we will use the select input type of our form.  This let's us select a value from a picklist so the script will have the same value each time.  With the text field, the user can type whatever they want and the script will print it back.  With the select input type, the value is already entered in the html.

Name the html form formyou.html where you is your name.  After you upload it, access it here: http://gwc.daisyware.com/formyou2.html
When you create the html file, you'll notice a reference to the script in the cgi-bin directory.  Change the name of the script to formyou2.py where you is your name

Here is the form for the html directory.  You'll name this file formyou2.html

<!--change where it says form.py to formyou.py where you is your name, e.g. formlou2.py-->
<form action="/cgi-bin/formlou2.py" method="post">
    FirstName: <input type="text" name="first_name">
    LastName: <input type="text" name="last_name">
    <select name="mood">
        <option value="happy">Happy</option>
        <option value="funny">Funny</option>
        <option value="tired">Tired</option>
        <option value="hungry">Hungry</option>
      </select>
    <input type="submit" value="go">
    </form>

Here is the code for the cgi-bin directory.  You'll name the file formyou2.py, e.g. formlou2.py.  Make sure to change you in formyou.py to your name.  Notice that we have a new variable called my_mood.  This is the value that the user selected in the html form using the select input type.  You'll also notice two variables called hungry_fix and tired_fix.  They each have a suggestion for the user on what to do about their mood.  Add others, such as happy_fix and funny_fix to your script after you get the base script working.  You can also add more options in the select field in the html form.  Then notice that we have an "if" statement.  The if statement looks at the mood the user selected and then prints the suggestion based on the mood.

#!/bin/python
# Import modules for CGI handling
import cgi, cgitb
# Create instance of FieldStorage
form = cgi.FieldStorage()
# Get data from fields
hungry_fix="Go to the deli"
tired_fix="Take a nap"
first_name = form.getvalue('first_name')
last_name = form.getvalue('last_name')
my_mood = form.getvalue('mood')
print("Content-type:text/html")
print
print("")
print("")
print("")
print(" Hello %s %s" % (first_name, last_name))
print("<br>")
if my_mood=="hungry":
    print hungry_fix
if my_mood=="tired":
    print tired_fix
print("")
print("")

Friday, April 12, 2019

Girls Who Code Lou Person Process Input Form

In this lesson, we will create a form in HTML which will submit the data to a script in Python to be processed.  You will create 2 files.  The first file will be the form and it will be in html.  The second file will be a python script which will go in the cgi-bin directory.

Name the html form formyou.html where you is your name.  After you upload it, access it here: http://gwc.daisyware.com/formyou.html
When you create the html file, you'll notice a reference to the script in the cgi-bin directory.  Change the name of the script to formyou.py where you is your name

Here is the form for the the html directory.  You'll name this file formyou.html

<!--change where it says form.py to formyou.py where you is your name, e.g. formlou.py-->
<form action="/cgi-bin/form.py" method="post">
FirstName: <input type="text" name="first_name">
LastName: <input type="text" name="last_name">
<input type="submit" value="go">
</form>

Here is the code for the cgi-bin directory.  You'll name the file formyou.py, e.g. formlou.py.  Make sure to change you in formyou.py to your name.

#!/bin/python
# Import modules for CGI handling
import cgi, cgitb
# Create instance of FieldStorage
form = cgi.FieldStorage()
# Get data from fields
first_name = form.getvalue('first_name')
last_name = form.getvalue('last_name')
print("Content-type:text/html")
print
print("")
print("")
print("Hello")
print("")
print(" Hello %s %s" % (first_name, last_name))
print("<br>")
print(first_name, last_name)
print("")
print("")

Friday, March 29, 2019

Girls Who Code Dynamic HTML Lesson - Lou Person

This lesson will show you how to create a simple dynamic HTML page.  A dynamic HTML page is a web page that is generated by a program running on the server.  A static HTML page is a web page that is a flat file.

First, create your file.  give it your name and enter .py at the end, as an example lou.py
The py at the end of the file name indicates it is a python file.

Insert the following into your file, exactly as it appears.  Copy and paste everything between ##start## and ##end## but do not includes ##start## and ##end## only what's between them.

##start##
#!/bin/python

# Required header that tells the browser how to render the text.

print("Content-Type: text/html\n\n")

# Print a simple message to the display window.

print("<h1>Hello, World!</h1>\n")
##end##

Go to Filezilla.  This time, you will be uploading the file to cgi-bin not html.  When you login, click on cgi-bin.  The server is gwc.daisyware.com.  It should look like this:

Now that the file is uploaded, you can access it as follows: http://gwc.daisyware.com/lou.py 
(Change the name to your name.  Replace the name of the file with the name you used).

Next, we are going to create another file to add two variables together and display the results.
First, create another file with your name and the number 2, e.g. lou2.py
Enter the following in the file (everything between ##start## and ##end##(

##start##
#!/bin/python

# Required header that tells the browser how to render the text.
print("Content-Type: text/html\n\n")  

# Print a simple message to the display window.
print("<h1>Hello, World!<h1>\n")
var1=2
var2=3
var3=var1 + var2
print("<h1>The value is: \n")
print(var3)
print("</h1>\n")

##end##

Upload the file to the cgi-bin directory using Filezilla and access it as follows: http://gwc.daisyware.com/cgi-bin/lou2.py 
(Change the name to your name.  Replace the name of the file with the name you used).


Monday, December 25, 2017

Amazon Connect Part 1 - Lou Person


Before joining AWS, one of the services my company provided was building Enterprise Contact Centers for customers.  We had been doing it since 2004, right about the time VoIP revolutionized Contact Centers in favor of TDM based solutions.  Having worked with Amazon Connect in my lab for a while now, I believe it to be another leap forward, another evolutionary change in Contact Centers.  This post will try to compare and contrast the different components of the Contact Center between Connect and the legacy systems I worked with while giving a practical example of how Amazon Connect works.  

Deploying the Contact Center
Deploying Connect and taking calls was very easy to do.  Granted, I already had an AWS account.  If I did not, it would have added another few minutes to create, and no other AWS services are required to be configured.  Once logged in, there are a number of ways to access the Connect service, I select if from the A-Z list of services.  Once on the Connect dashboard, I click the blue "Get Started" button.  The prompts are very simple: I give it a directory name for identity management (created and managed by AWS), create an administrator account, enable incoming and outgoing calls via checkbox, accept the default S3 bucket connect creates for logs and recordings and create the instance which takes about a minute to provision.  Next, I hit another blue "Get Started" button, claim a phone number (Direct Dial or Toll Free), and that's it!  The Contact Center is now deployed.  An agent tool automatically launched allowing me to take calls from the default queue.  The other defaults are fine for now, I'll build out a sample IVR and Queue below, but from the dashboard, I can configure: Hours of Operation, Queues, Prompts, Contact Flows, Routing Profiles and users.  The best part?  Building all of this did not require any capital outlay.  In other words, I didn't have to purchase servers, switches, software licenses, operating systems, hypervisors, UPS, cables or even phones.  A full functioning Enterprise Contact Center was deployed without spending any money and investing just a little bit of time.


Here are some of the steps I would have gone through to Deploy the Contact Center in the old days of 2016.  These steps are not necessary in Amazon Connect:
  1. At least 5 servers/switches would have been needed: Contact Center Management, System Management, Call Control, Trunk Management and Call Recording.  The sizing of this system would require Solution Architecture and Sales Engineering, calls to distributors or manufacturers to configure, installation of the operating system, rack and stacking including power and cooling, integration with directories and network configuration.  Engineers smarter than myself would need to be dispatched and it would take significant effort to get working.  The phone system, contact center and call recording are really three separate systems.
  2. Redundancy (N+1, etc) and Backups were always a concern.  The system would need to have extra components procured and provisioned to account for failures.  Anticipated spikes would also require additional capacity to be provisioned to accommodate the spike.  The numerous directories (configurations, call recordings, logs, call detail records, prompts, etc) would need to be backed up reliably.
  3. The infrastructure would need to be managed on an going basis.  This included such tasks as patching, anti-virus, managing failed components, cooling, power, etc.
  4. The phone numbers and dial tone for the Contact Center would need to be provisioned.  A services provider would need to be selected, and they would need to provision multiple circuits into the call center.  Vendor meets would need to be scheduled to coordinate the activation of the circuits and signaling compatibilities.  This could take 4-6 weeks and hopefully the circuit is clean and reliable and doesn't go down in bad weather, nor have problems with the smart jack inside the premise.  An existing, or new, phone system would need to be integrated to route the dial tone from the carrier to the Contact Center.
  5. Separate 800 services would need to be procured and provisioned to point to the lead number in the call center.
  6. The agent software would need to be deployed on each agent's station.  This would require an msi pushed out through active directory and minimum requirements to be met.
Configuring the first Contact Flow
Creating the first Contact Flow (Connect nomenclature) was really easy.  There were 19 sample Contact Flows to start from which provided some great examples.  I used the contact flow editor to create an IVR which answered the call from the inbound dialed number, read 2 choices to the user from the text in the action block, sent the caller to an agent if 1 was pressed and dipped to a Lambda script if 2 was pressed.  Here is what the completed Contact Flow looks like:


The first action box plays a prompt and reads the text entered (more on that below).  The second action box "Get customer prompt" reads text as a prompt and takes as input DTMF tones (buttons pressed on the phone) and then based on the numbers pressed, branches to another contact flow.  


In the Transfer to flow action box, the contact flow branched to is selected, see below for an example:


Finally, I went to the phone number in the phone number section and assigned it to the contact flow created above:


Prompts
Creating and playing prompts is refreshingly easy.  In the "Play Prompt" action block, which the contact flow is linked to via the contact flow editor.  Clicking on the Play Prompt action box brings up a configuration panel.  From here, I select Text to Speech, and the Text entered is actually read to the caller using AWS Text to Speech (TTS).  The Set Voice action block can be used to select from 24 different languages, and based on the language, different voices can be selected.  A prerecorded prompt can also be selected from an S3 bucket.  Here is what the Play Prompt action block looks like:


In the old systems, text entered in prompts was only used for information purposes, it wasn't read to the user via TTS.  Instead, it was a cumbersome process of having a professional record prompts, name them properly, upload them to the prompt folder and then link them to the prompt to be played to the caller.


IVR through Lambda

One of Amazon Connects greatest features is it's ability to leverage AWS Lambda to build applications into the IVR.  This was also very easy to do.  As noted above, option 2 of the contact flow calls a Lambda function which will speak back the phone number dialed from, in other words, the inbound DID.  Lambda and Connect are very powerful together.  In the older system I worked with, call control was provided from a separate system than the Contact Center system.  They were lightly integrated, but not to the extent Connect and Lambda are integrated.  One aspect of the old system is that applications could only be connected via ODBC and the IVR could only dip into external applications via SQL commands sent through ODBC.  This made it very difficult to program because so much, including state, had to be managed within the third party application database tables.  With Amazon Connect, any application or system can be called by using Lambda and variables can be set and passed into the Lambda function and then passed back out.  Setting is very easy using the "Set contact attributes" action block.  It is impressive how many variables of the call detail record are available to the Lambda function on a global basis, which can be viewed here: http://docs.aws.amazon.com/connect/latest/adminguide/connect-lambda-functions.html

Creating the Lambda function was easy:
  1. Went into the Lambda console in the region the Amazon Connect instance is configured.
  2. Named the function readphone, chose node.js 6.10 and assigned a role that would provide lambda_basic_execution.
  3. Noted the arn of the lambda function, the arn of the connect instance and the AWS account number.  
  4. Followed this document http://docs.aws.amazon.com/connect/latest/adminguide/connect-lambda-functions.html to created a resource policy via the AWS CLI to allow Amazon Connect to invoke the Lambda function, it looked something like this: aws lambda add-permission --function-name function:readphone --statement-id 1 --principal connect.amazonaws.com --action lambda:InvokeFunction --source-account 123456789012 --source-arn arn:aws:connect:us-east-1:123456789012:instance/def1a4fc-ac9d-11e6-b582-06a0be38cccf  
  5. Entered this code into the actual function code window in index.js:
'use strict';
console.log('Loading function');
exports.handler = (event, context, callback) => {
    const phoneNumber = event.Details.ContactData.CustomerEndpoint.Address;
    const state = phoneNumber;
    callback( null, { State: state } );
    return;
};
Here is what the Lambda contact flow looks like:

Lambda with Amazon Connect as an IVR is very powerful and very simple.  Variables can be set from within Lambda which can then be seamlessly accessed by an action block.  In the case of this example, a prompt to read back the number.  The following step of the contact flow reads the variable callerNumber set in the Lambda function by simply using the "$.External." reference.  Note below the first image is the Lambda console, see where the variable is passed back from Lambda in the code: 
callback( null, { callerNumber: phoneNumber } );

Note the second image is the Play Prompt action block and see where the variable is accessed and then read to the caller: <speak>Your phone number is <say-as interpret-as="telephone">$.External.callerNumber</say-as></speak>

Lambda console:

Play Prompt action block:


Agents

The agent tool is web based (although can be configured to use a deskphone).  It installed very easily and agents are able to accept calls immediately.  In the old system, this would require an agent client to be installed on the computer with operating system dependencies and OS by OS availability.  With Amazon Connect, the agent goes to a URL for the Amazon Connect instance and logs into the queue.  The agent functionality includes all that is expected, including listen-in, wrap-up and robust supervisor/agent interaction.


SSML Integration

The older system I worked with was able to read back digits in a simple computerized manner.  It wasn't able to exert control over how speech is generated from the text provided or dynamically generated.  On the other hand, Amazon Connect supports Speech Synthesis Markup Language in a number of places, which is on top of the ability to set languages and voices before reading the prompt.  According to Wikipedia, SSML is an XML-based markup language for speech synthesis applications.  In the IVR connect flow mentioned above, one of the action blocks would read back the phone number generated by the Lambda call in the previous action block.  When "interpret as" was set to "text", it read the phone number as a number so it sound like +1 2,412,254,786 "Plus twelve billion four hundred twelve million, two hundred fifty four thousand, seven hundred eight six".  After changing "interpret as" to SSML, the number was read as a phone number with each digit read individually and pauses after the "-" in the phone number.  The SSML in the action block looks like this (notice the variable passed back from the Lambda call in the previous action block): <speak>Your phone number is <say-as interpret-as="telephone">$.External.State</say-as></speak>

Here is what the action block looks like:

Comparing Connect to other Cloud Contact Centers
There are other Cloud Contact center solutions on the market and I have also worked with a number of those.  Amazon Connect has significant advantages to these other providers.  Many are run as traditional phone companies which means they lock you in to long term contracts.  Amazon Connect, as with other AWS services, can be consumed on an On-Demand basis where only what is used is paid for.  There is no commitment and the Contact Center can be turned off at anytime, or simply calls aren't routed to it, while all of the programming is preserved so it can be used again at anytime.  It will always be available without incurring charges except when it is being used.  Other Cloud Contact center solutions are hard pressed to keep up with the pace of innovation from AWS.  Amazon Connect integrates with all of the other AWS services, including Lambda, Lex, Polly, S3, Analytics, Dashboards, Machine Learning, Artificial Intelligence, Bots, etc.  By doing so, the Amazon Connect based Contact Center can be natively extended using these services in ways that the other providers cannot.

Monday, October 2, 2017

Programmatically engaging Blockchain using Ethereum JavaScript API - Lou Person

Programmatically engaging Blockchain using Ethereum JavaScript API by Lou Person

This weekend, I started writing a Wallet application for the Ethereum network. The Wallet will talk to the node on the Blockchain which stores my keys and account information. It was a simple application which will display the account balance but I was exposed to the methods and classes which would allow transacting on the block chain to occur. For example, the ability to purchase and send Ethers will be easy to code. Listing and selecting accounts and contracts will also be easy to program. From there, applications can be written to interact with the blockchain ledger and drive business decisions. The primary environment is client-side JavaScript. Hitting the “Update my balance” makes a call to the node and the balance for the account which is hard coded is returned (you can see this in the code below referenced as web3.eth.accounts[0]).

The infrastructure to accomplish this is all done on AWS. On a Ubuntu server running on AWS, Ethereum is installed. You can read more about it here: http://blog.louperson.com/2017/09/created-3-node-private-ethereum.html. This post also provides a graphical user interface on top of the command line interface for managing transactions on the Blockchain.  The following post discusses how to use the command line to send transactions on the Blockchain:  http://blog.louperson.com/2017/09/sending-transactions-in-private.html

In addition, a web server was installed and Port 80 was opened in the Security Group for inbound traffic. Outbound was not explicitly required, because with AWS, any traffic which is allowed in is also allowed back out by default without the need for a corresponding Outbound rule. Port 8545 is used to communicate between Ethereum client applications and the server node, which was also opened in the Security Groups on AWS for inbound traffic.

With Blockchain technology maturing, this is a bit of a risk because most networks won’t readily have Port 8545 open for communication, which would encumber client-side applications from communicating with the Block chain. I made a note to investigate alternative solutions for client side to server-side node communications. Here is the simple application presented on a web page:


The Webserver used is Apache, which installed very easily as follows:
sudo apt-get update
sudo apt-get install apache2
sudo ufw allow 'Apache Full'

Then, I changed to the /var/www/html directory and installed the Ethereum JavaScript API:
git clone https://github.com/ethereum/web3.js.git

The following code was used to create the index.html file. It is JavaScript referencing the Ethereum JavaScript API. Note the calls to the Web3 object which is referenced in the web3.js/dist/web3.min.js library.

<!doctype html>
<html>
<head>
<title>myDapp</title>
<script src="web3.js/dist/web3.min.js"></script>
<script type="text/javascript">
if (typeof web3 !== 'undefined') {
web3 = new Web3(web3.currentProvider);
} else {
// set the provider you want from Web3.providers
web3 = new Web3(new Web3.providers.HttpProvider("http://ec2-xx-xx-xx-219.us-west-2.compute.amazonaws.com:8545"));
}

function getBalance() {
document.getElementById("myBalance").innerText = web3.fromWei(web3.eth.getBalance(web3.eth.accounts[0]), "ether");
}
</script>
</head>
<body>

<h1>This is my balance</h1>
<button onclick="getBalance()">Update my balance</button>
<span id="myBalance"></span> in Ether
</body>
</html>

Understanding this layer is important because it provides a frame of reference for programmatically engaging the blockchain and once you get the “hello world” application working, it is pretty much all downhill. I would have gone much deeper this weekend, but we got a puppy.

Source: https://www.udemy.com/blockchain-developer/

Sunday, September 24, 2017

Sending Transactions in a private Ethereum Blockchain Network - Lou Person

Sending Transactions in a private Ethereum Blockchain Network - Lou Person

There are many ways to send transactions across a Blockchain network.  This post discusses how it is done using basic methods, such as sending from a software wallet and using send transactions from the command line.  These methods are essentially equivalent to “Hello World” applications to prove out that all pieces of the stack are successfully installed and properly communicating.  Transactions can also be sent programmatically through contracts written in Solidity on the Ethereum network, but that will be a later post. 

There are a few components to a distributed Blockchain system that enable transactions to be passed between accounts participating in the Blockchain. The components are:
  • The network itself. I have been using Ethereum primarily. You can create accounts on the network before the Blockchain is launched. A network can be private, where a node has to be invited in, or Public, where anyone can attach.
  • The Blockchain. A blockchain is initialized, or launched, on the network. A genesis.json file describes the Blockchain and currency can be allocated to accounts on launch if the account id is known.
  • Nodes. When a node is launched, it will download all the Blocks previously created on the Blockchain.
  • Accounts. An account contains an ID, cryptography key and a password. Wallets are developed around the accounts to make them easier to manage, as well as send transactions directly or through contracts.
  • Contracts. Contracts are created programmatically and used to transact within the network, between accounts. The Ethereum network uses Solidity as the programming environment.
  • Cryptocurrency. When a Blockchain is launched, accounts can be allocated currency. Alternatively, cryptocurrency can be mined on the network through an attached node and allocated to an account was successfully mined. In the Ethereum network, the currency are Ethers.
Here are some scenarios to piece all of this together: 

Created a 3 node Ethereum network
A 3 node Ethereum network was created, read more about it here: http://blog.louperson.com/2017/09/created-3-node-private-ethereum.html

Launch an Ubuntu Server on AWS, open the requisite ports and install putty
AWS makes all of this so easy, and frankly, if it wasn’t for the evolution of AWS as a Public Cloud provider, Blockchains would be much less credible. Blockchain requires always on, highly available and distributed computing resources. Using AWS to host Blockchain (in this case Ethereum nodes) provides a highly reliable, infinitely scalable, fully distributed, secure and cost effective platform. A few quick notes on AWS (most importantly the ports that are needed in the security group):

Create a root account and protect it with a hardware based MFA.
Create IAM accounts and enable soft MFA, try to work out of the IAM accounts and not root.
Create a Security Group, give it a meaningful name such as Blockchain, and make sure these inbound ports are open:
  • 30303, 35376, 30333 – Blockchain peering protocol (probably only 1 is needed if there is consistency when launching nodes) 
  • 22 – SSH 
  • 8545 – Used by Wallets and Contracts to talk to the nodes for account information 
At the time of writing, this Amazon Machine Image (AMI) was ideal: Ubuntu Server 16.04 LTS (HVM), SSD Volume Type - ami-6e1a0117
Select the Instance Type. The t2.micro free Tier should be fine, it can always be scaled up later, part of the beauty of AWS.
Select defaults under Instance details.
Create one volume of 30GB. General purpose SSD is fine.
Add tags as needed for administration, automation and reporting purposes, or leave blank.
Add the instance to the Security Group previously configured.
Review and launch.
Create an Elastic IP and assign it to the EC2 instance that was just launched.
Use an existing key pair or create a new one, but make sure it is downloaded and saved because it is required when connecting to the server. The .pem file is required to be downloaded before the server is launched.
Connect to the server using Putty or other ssh client, instructions for Putty here: http://docs.aws.amazon.com/AWSEC2/latest/UserGuide/putty.html
Install the following on the server:
  • sudo apt-get install software-properties-common 
  • sudo add-apt-repository -y ppa:ethereum/ethereum 
  • sudo apt-get update 
  • sudo apt-get install ethereum
Create the Genesis.json file and initialize the node
It’s best to keep this file as simple as possible.  Use the alloc statement to allocate ethers to a few accounts initially, but this isn’t necessary, in fact, it adds complexity to the Genesis.json file.
{
    "config": {
        "chainId": 15,
        "homesteadBlock": 0,
        "eip155Block": 0,
        "eip158Block": 0
    },
    "nonce": "0x0000000000000042",
    "mixhash": "0x0000000000000000000000000000000000000000000000000000000000000000",
    "difficulty": "0x4000",
    "alloc": {},
    "coinbase": "0x0000000000000000000000000000000000000000",
    "timestamp": "0x00",
    "parentHash": "0x0000000000000000000000000000000000000000000000000000000000000000",
    "gasLimit": "0xffffffff",
    "alloc": {
        "aba11d916475e---------a9b916----97b9508e": { "balance": "20000000000000000000" },
        "31e3575b7----------29634fb8053----02fbbab": { "balance": "40000000000000000000" },
        "c5f995a---------0a9f20db650fb142----e698": { "balance": "40000000000000000000" }

    }
}
Initialize the node: $geth init Genesis.json

Create a shell file to launch the network with this command:
nohup geth -rpc --rpcaddr "0.0.0.0" --rpcapi personal,web3,eth --networkid 23 --nodiscover --maxpeers 10  --port 30303 &
Call the file rungeth.sh and did a chmod 775 rungeth.sh on it so it is executable as  .\rungeth.sh
Use the following command to list all the accounts in the network, of which there were none at launch:
geth account list rpc:http://localhost:8545

Create accounts directly on the primary node using Mist
Install mist on the client-side machine.  By doing so, the entire Blockchain doesn’t need to be downloaded directly, which saved space.  Also, any mining work will be done on the remote server on which the node is running, so much thinner hardware can be used on the client side.
Then, connect to the main node:
mist --rpc http://54.68.50.219:8545 --swarmurl=http://swarm-gateways.net
Once attached, hit the Add Account button, create the account and give it a password.  Add a few accounts for experimentation purposes in the sections below.  The key will be stored on the server side.  Once the account is created, list the accounts and the new account will appear (this command is not sent through the geth console):
$ geth account list rpc:http://localhost:8545
Account #0: {aba11d916475e48----------91640d997b9508e} keystore:///home/ubuntu/.ethereum/keystore/UTC--2017-09-22T19-43-46.697950494Z--aba11d916475e4----------640d997b9508e
Account #1: {f201d1ac0ec3a64f82e9----------93c1890} keystore:///home/ubuntu/.ethereum/keystore/UTC--2017-09-23T15-16-18.421518845Z--f201d----------f82e9a54c11d6ffb9f93c1890
Account #2: {3bd8646cc9----------f8812d670ea607687a05} keystore:///home/ubuntu/.ethereum/keystore/UTC--2017-09-23T22-24-57.228977892Z--3bd86----------52063f8812d670ea607687a05
This also lists accounts from the geth console: >eth.accounts

Mine Ethers into the account
With geth running in the background, attach to the console:
$geth attach
Set the account that you want to mine into referencing the account list above:
> miner.setEtherbase(eth.accounts[1])
Launch the miner:
>miner.start(10)
Note that 10 is the number of threads that will be used for mining, another benefit of working with AWS so the requisite processing is available.
After sufficient Ethers are added to the account, about 1000, switch wallets:
> miner.setEtherbase(eth.accounts[2])
When done, stop the miner:
>miner.stop()

Ethers will now appear in the account on the Mist wallet.  For the other sections below, add Ethers to all the accounts created.

Checking account balances
The following command is used to check balances of the accounts.  The number after eth.accounts represents the number of the account for which the balance is being queried:
> balance = web3.fromWei(eth.getBalance(eth.accounts[0]), "ether");

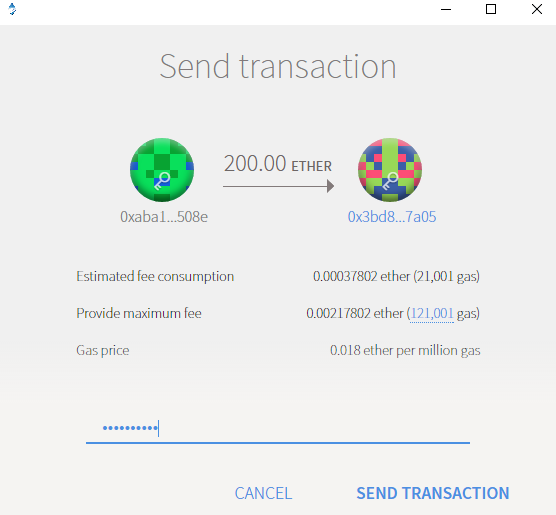
Send Transactions using Mist
In the Mist wallet, select one of the accounts that Ethers will be sent from, enter an account that Ethers will be sent to.  Using the account list above, this example used this account:
3bd8646cc9----------f8812d670ea607687a05
Enter an amount.
Hit send.

On the geth console on the server, view the pending transaction:
>eth.pendingTransactions
Here is what the pending transaction will look like:
[{
    blockHash: null,
    blockNumber: null,
    from: "0xaba11d916475e48----------91640d997b9508e",
    gas: 121001,
    gasPrice: 18000000000,
    hash: "0x21c8720e4ec5885---------------4f1e33870f3db0576ede88bea50529d96d",
    input: "0x",
    nonce: 2,
    r: "0xe0ad06721af4be89e87239---------------31b3e9cb2c9abf07dde41e7cd9c",
    s: "0x7cadeb998790304009fb---------------0f25178df8f4c008f139cedd3dddc",
    to: "0x3bd8646cc9----------f8812d670ea607687a05", transactionIndex: 0,
    v: "0x41",
    value: 200000000000000000000
}]
Enter this command to post the transactions: 
> miner.start();admin.sleepBlocks(1);miner.stop();

The pending transaction queue will go to null and the Ethers will be transferred between wallets.
Check the account balances using:
> balance = web3.fromWei(eth.getBalance(eth.accounts[0]), "ether");
> balance = web3.fromWei(eth.getBalance(eth.accounts[2]), "ether");

Send Transactions using the SendTransaction command
From the geth console, use the SendTransaction command to send Ethers between two accounts as follows:
First, unlock the seconding account:
personal.unlockAccount("'aba11d916475e48----------91640d997b9508e'")

Then, send the transaction.
>eth.sendTransaction({from: '0xaba11d916475e48----------91640d997b9508e', to: ' f201d1ac0ec3a64f82e9----------93c1890', value: web3.toWei(23, "ether")})

Check it is pending: >eth.pendingTransactions
This command is needed to execute the transaction:
> miner.start();admin.sleepBlocks(1);miner.stop();

Adding a node to the Blockchain
On the first node, run this command from the geth console to get the node information:
>admin.nodeInfo.enode
Copy and paste what is returned, changing the [::] to the public IP address of the server.

To add an independent node to the Blockchain, launch geth on the second server and then run this command, replacing the text after enode:// and the IP address with the correct values of the real environment, sample data is used:

admin.addPeer("enode:// be89ed26d4bc95e2bf7e388a8ec--------------------7f8b5ef80a2bb7e62dd2de6dd03d8cff6609570eb--------------------1bf404ca1ae3659f0149@54.22.33.169:35376?discport=0")
Wait a few seconds, then on both servers run
>net.peerCount
and each should return 1 indicating the nodes are connected.

Launching another node into the network using a Bootloader
Setup another server per the instructions above and initialize it using the same Genesis.json file.
On the first node, run this command from the geth console to get the node information:
>admin.nodeInfo.enode
Copy and paste what is returned, changing the [::] to the public IP address of the server.
On the main server, enter this:
>net.peerCount which should return 0 because the second node is connected yet.
On the second node, launch geth by attaching to the Bootloader as follows:
geth  --networkid 23 --bootnodes enode://be89ed26d4bc95e2bf7e388a8ec--------------------7f8b5ef80a2bb7e62dd2de6dd03d8cff6609570eb--------------------1bf404ca1ae3659f0149@54.22.33.169:30303 console

Wait a few seconds, then on both servers run
>net.peerCount
and each should return 1 indicating the nodes are connected.

Create a new account on the second node:
>personal.newAccount()

On the second node, list the accounts to confirm the account was created
> eth.accounts
["0x6fd643e5------------5ec78423be-----0f9d4"]

On the second node, list the balance of the account, it should be 0 because it was just created:
> balance = web3.fromWei(eth.getBalance(eth.accounts[0]), "ether");

With the two nodes created, send a transaction from the from an account on the first node to the account on the second node.  The account on the second node will not be visible directly on the first node, it needs to be explicitly entered.  This is due to the second node managing the keystore of the accounts associated with that node.  However, since the two nodes are connected, transactions can be sent between them.
>eth.sendTransaction({from: 'aba11d916475e48----------91640d997b9508e ', to: '0x6fd643e5------------5ec78423be-----0f9d4', value: web3.toWei(500, "ether")})

List pending transactions:
> eth.pendingTransactions

On the first node, post the transaction:
>miner.start();admin.sleepBlocks(1);miner.stop();

On the second node, check the balance and the ethers should have posted across the nodes:
> balance = web3.fromWei(eth.getBalance(eth.accounts[0]), "ether");
500

What comes next
Later posts will describe how to post transactions using programmatic contracts, as well as what is happening behind the scenes, such as authorizations from all nodes on the Blockchain.