Monday, December 25, 2017

Amazon Connect Part 1 - Lou Person


Before joining AWS, one of the services my company provided was building Enterprise Contact Centers for customers.  We had been doing it since 2004, right about the time VoIP revolutionized Contact Centers in favor of TDM based solutions.  Having worked with Amazon Connect in my lab for a while now, I believe it to be another leap forward, another evolutionary change in Contact Centers.  This post will try to compare and contrast the different components of the Contact Center between Connect and the legacy systems I worked with while giving a practical example of how Amazon Connect works.  

Deploying the Contact Center
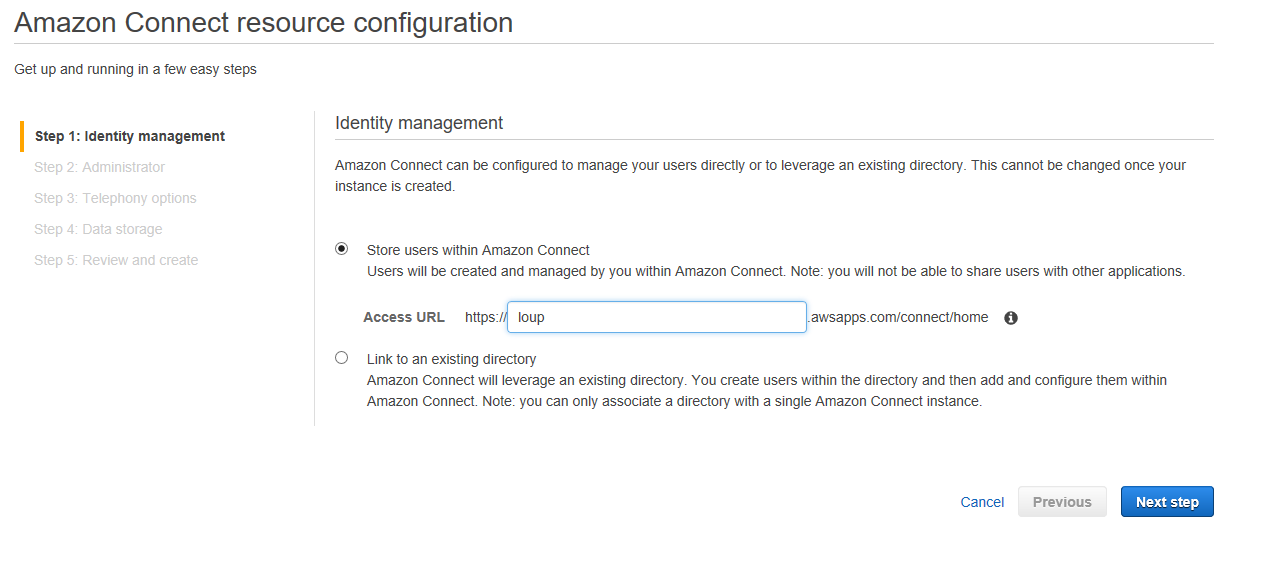
Deploying Connect and taking calls was very easy to do.  Granted, I already had an AWS account.  If I did not, it would have added another few minutes to create, and no other AWS services are required to be configured.  Once logged in, there are a number of ways to access the Connect service, I select if from the A-Z list of services.  Once on the Connect dashboard, I click the blue "Get Started" button.  The prompts are very simple: I give it a directory name for identity management (created and managed by AWS), create an administrator account, enable incoming and outgoing calls via checkbox, accept the default S3 bucket connect creates for logs and recordings and create the instance which takes about a minute to provision.  Next, I hit another blue "Get Started" button, claim a phone number (Direct Dial or Toll Free), and that's it!  The Contact Center is now deployed.  An agent tool automatically launched allowing me to take calls from the default queue.  The other defaults are fine for now, I'll build out a sample IVR and Queue below, but from the dashboard, I can configure: Hours of Operation, Queues, Prompts, Contact Flows, Routing Profiles and users.  The best part?  Building all of this did not require any capital outlay.  In other words, I didn't have to purchase servers, switches, software licenses, operating systems, hypervisors, UPS, cables or even phones.  A full functioning Enterprise Contact Center was deployed without spending any money and investing just a little bit of time.


Here are some of the steps I would have gone through to Deploy the Contact Center in the old days of 2016.  These steps are not necessary in Amazon Connect:
  1. At least 5 servers/switches would have been needed: Contact Center Management, System Management, Call Control, Trunk Management and Call Recording.  The sizing of this system would require Solution Architecture and Sales Engineering, calls to distributors or manufacturers to configure, installation of the operating system, rack and stacking including power and cooling, integration with directories and network configuration.  Engineers smarter than myself would need to be dispatched and it would take significant effort to get working.  The phone system, contact center and call recording are really three separate systems.
  2. Redundancy (N+1, etc) and Backups were always a concern.  The system would need to have extra components procured and provisioned to account for failures.  Anticipated spikes would also require additional capacity to be provisioned to accommodate the spike.  The numerous directories (configurations, call recordings, logs, call detail records, prompts, etc) would need to be backed up reliably.
  3. The infrastructure would need to be managed on an going basis.  This included such tasks as patching, anti-virus, managing failed components, cooling, power, etc.
  4. The phone numbers and dial tone for the Contact Center would need to be provisioned.  A services provider would need to be selected, and they would need to provision multiple circuits into the call center.  Vendor meets would need to be scheduled to coordinate the activation of the circuits and signaling compatibilities.  This could take 4-6 weeks and hopefully the circuit is clean and reliable and doesn't go down in bad weather, nor have problems with the smart jack inside the premise.  An existing, or new, phone system would need to be integrated to route the dial tone from the carrier to the Contact Center.
  5. Separate 800 services would need to be procured and provisioned to point to the lead number in the call center.
  6. The agent software would need to be deployed on each agent's station.  This would require an msi pushed out through active directory and minimum requirements to be met.
Configuring the first Contact Flow
Creating the first Contact Flow (Connect nomenclature) was really easy.  There were 19 sample Contact Flows to start from which provided some great examples.  I used the contact flow editor to create an IVR which answered the call from the inbound dialed number, read 2 choices to the user from the text in the action block, sent the caller to an agent if 1 was pressed and dipped to a Lambda script if 2 was pressed.  Here is what the completed Contact Flow looks like:


The first action box plays a prompt and reads the text entered (more on that below).  The second action box "Get customer prompt" reads text as a prompt and takes as input DTMF tones (buttons pressed on the phone) and then based on the numbers pressed, branches to another contact flow.  


In the Transfer to flow action box, the contact flow branched to is selected, see below for an example:


Finally, I went to the phone number in the phone number section and assigned it to the contact flow created above:


Prompts
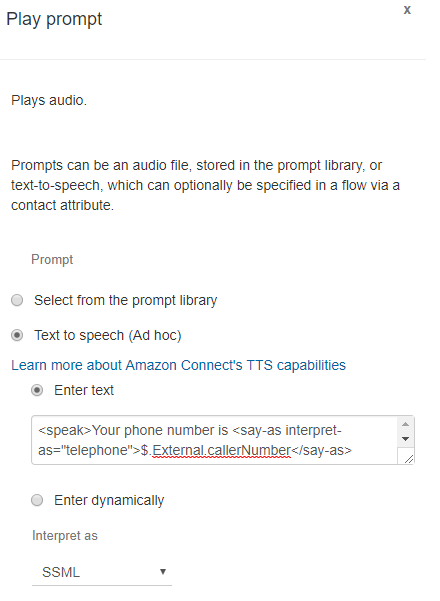
Creating and playing prompts is refreshingly easy.  In the "Play Prompt" action block, which the contact flow is linked to via the contact flow editor.  Clicking on the Play Prompt action box brings up a configuration panel.  From here, I select Text to Speech, and the Text entered is actually read to the caller using AWS Text to Speech (TTS).  The Set Voice action block can be used to select from 24 different languages, and based on the language, different voices can be selected.  A prerecorded prompt can also be selected from an S3 bucket.  Here is what the Play Prompt action block looks like:


In the old systems, text entered in prompts was only used for information purposes, it wasn't read to the user via TTS.  Instead, it was a cumbersome process of having a professional record prompts, name them properly, upload them to the prompt folder and then link them to the prompt to be played to the caller.


IVR through Lambda

One of Amazon Connects greatest features is it's ability to leverage AWS Lambda to build applications into the IVR.  This was also very easy to do.  As noted above, option 2 of the contact flow calls a Lambda function which will speak back the phone number dialed from, in other words, the inbound DID.  Lambda and Connect are very powerful together.  In the older system I worked with, call control was provided from a separate system than the Contact Center system.  They were lightly integrated, but not to the extent Connect and Lambda are integrated.  One aspect of the old system is that applications could only be connected via ODBC and the IVR could only dip into external applications via SQL commands sent through ODBC.  This made it very difficult to program because so much, including state, had to be managed within the third party application database tables.  With Amazon Connect, any application or system can be called by using Lambda and variables can be set and passed into the Lambda function and then passed back out.  Setting is very easy using the "Set contact attributes" action block.  It is impressive how many variables of the call detail record are available to the Lambda function on a global basis, which can be viewed here: http://docs.aws.amazon.com/connect/latest/adminguide/connect-lambda-functions.html

Creating the Lambda function was easy:
  1. Went into the Lambda console in the region the Amazon Connect instance is configured.
  2. Named the function readphone, chose node.js 6.10 and assigned a role that would provide lambda_basic_execution.
  3. Noted the arn of the lambda function, the arn of the connect instance and the AWS account number.  
  4. Followed this document http://docs.aws.amazon.com/connect/latest/adminguide/connect-lambda-functions.html to created a resource policy via the AWS CLI to allow Amazon Connect to invoke the Lambda function, it looked something like this: aws lambda add-permission --function-name function:readphone --statement-id 1 --principal connect.amazonaws.com --action lambda:InvokeFunction --source-account 123456789012 --source-arn arn:aws:connect:us-east-1:123456789012:instance/def1a4fc-ac9d-11e6-b582-06a0be38cccf  
  5. Entered this code into the actual function code window in index.js:
'use strict';
console.log('Loading function');
exports.handler = (event, context, callback) => {
    const phoneNumber = event.Details.ContactData.CustomerEndpoint.Address;
    const state = phoneNumber;
    callback( null, { State: state } );
    return;
};
Here is what the Lambda contact flow looks like:

Lambda with Amazon Connect as an IVR is very powerful and very simple.  Variables can be set from within Lambda which can then be seamlessly accessed by an action block.  In the case of this example, a prompt to read back the number.  The following step of the contact flow reads the variable callerNumber set in the Lambda function by simply using the "$.External." reference.  Note below the first image is the Lambda console, see where the variable is passed back from Lambda in the code: 
callback( null, { callerNumber: phoneNumber } );

Note the second image is the Play Prompt action block and see where the variable is accessed and then read to the caller: <speak>Your phone number is <say-as interpret-as="telephone">$.External.callerNumber</say-as></speak>

Lambda console:

Play Prompt action block:


Agents

The agent tool is web based (although can be configured to use a deskphone).  It installed very easily and agents are able to accept calls immediately.  In the old system, this would require an agent client to be installed on the computer with operating system dependencies and OS by OS availability.  With Amazon Connect, the agent goes to a URL for the Amazon Connect instance and logs into the queue.  The agent functionality includes all that is expected, including listen-in, wrap-up and robust supervisor/agent interaction.


SSML Integration

The older system I worked with was able to read back digits in a simple computerized manner.  It wasn't able to exert control over how speech is generated from the text provided or dynamically generated.  On the other hand, Amazon Connect supports Speech Synthesis Markup Language in a number of places, which is on top of the ability to set languages and voices before reading the prompt.  According to Wikipedia, SSML is an XML-based markup language for speech synthesis applications.  In the IVR connect flow mentioned above, one of the action blocks would read back the phone number generated by the Lambda call in the previous action block.  When "interpret as" was set to "text", it read the phone number as a number so it sound like +1 2,412,254,786 "Plus twelve billion four hundred twelve million, two hundred fifty four thousand, seven hundred eight six".  After changing "interpret as" to SSML, the number was read as a phone number with each digit read individually and pauses after the "-" in the phone number.  The SSML in the action block looks like this (notice the variable passed back from the Lambda call in the previous action block): <speak>Your phone number is <say-as interpret-as="telephone">$.External.State</say-as></speak>

Here is what the action block looks like:

Comparing Connect to other Cloud Contact Centers
There are other Cloud Contact center solutions on the market and I have also worked with a number of those.  Amazon Connect has significant advantages to these other providers.  Many are run as traditional phone companies which means they lock you in to long term contracts.  Amazon Connect, as with other AWS services, can be consumed on an On-Demand basis where only what is used is paid for.  There is no commitment and the Contact Center can be turned off at anytime, or simply calls aren't routed to it, while all of the programming is preserved so it can be used again at anytime.  It will always be available without incurring charges except when it is being used.  Other Cloud Contact center solutions are hard pressed to keep up with the pace of innovation from AWS.  Amazon Connect integrates with all of the other AWS services, including Lambda, Lex, Polly, S3, Analytics, Dashboards, Machine Learning, Artificial Intelligence, Bots, etc.  By doing so, the Amazon Connect based Contact Center can be natively extended using these services in ways that the other providers cannot.

Monday, October 2, 2017

Programmatically engaging Blockchain using Ethereum JavaScript API - Lou Person

Programmatically engaging Blockchain using Ethereum JavaScript API by Lou Person

This weekend, I started writing a Wallet application for the Ethereum network. The Wallet will talk to the node on the Blockchain which stores my keys and account information. It was a simple application which will display the account balance but I was exposed to the methods and classes which would allow transacting on the block chain to occur. For example, the ability to purchase and send Ethers will be easy to code. Listing and selecting accounts and contracts will also be easy to program. From there, applications can be written to interact with the blockchain ledger and drive business decisions. The primary environment is client-side JavaScript. Hitting the “Update my balance” makes a call to the node and the balance for the account which is hard coded is returned (you can see this in the code below referenced as web3.eth.accounts[0]).

The infrastructure to accomplish this is all done on AWS. On a Ubuntu server running on AWS, Ethereum is installed. You can read more about it here: http://blog.louperson.com/2017/09/created-3-node-private-ethereum.html. This post also provides a graphical user interface on top of the command line interface for managing transactions on the Blockchain.  The following post discusses how to use the command line to send transactions on the Blockchain:  http://blog.louperson.com/2017/09/sending-transactions-in-private.html

In addition, a web server was installed and Port 80 was opened in the Security Group for inbound traffic. Outbound was not explicitly required, because with AWS, any traffic which is allowed in is also allowed back out by default without the need for a corresponding Outbound rule. Port 8545 is used to communicate between Ethereum client applications and the server node, which was also opened in the Security Groups on AWS for inbound traffic.

With Blockchain technology maturing, this is a bit of a risk because most networks won’t readily have Port 8545 open for communication, which would encumber client-side applications from communicating with the Block chain. I made a note to investigate alternative solutions for client side to server-side node communications. Here is the simple application presented on a web page:


The Webserver used is Apache, which installed very easily as follows:
sudo apt-get update
sudo apt-get install apache2
sudo ufw allow 'Apache Full'

Then, I changed to the /var/www/html directory and installed the Ethereum JavaScript API:
git clone https://github.com/ethereum/web3.js.git

The following code was used to create the index.html file. It is JavaScript referencing the Ethereum JavaScript API. Note the calls to the Web3 object which is referenced in the web3.js/dist/web3.min.js library.

<!doctype html>
<html>
<head>
<title>myDapp</title>
<script src="web3.js/dist/web3.min.js"></script>
<script type="text/javascript">
if (typeof web3 !== 'undefined') {
web3 = new Web3(web3.currentProvider);
} else {
// set the provider you want from Web3.providers
web3 = new Web3(new Web3.providers.HttpProvider("http://ec2-xx-xx-xx-219.us-west-2.compute.amazonaws.com:8545"));
}

function getBalance() {
document.getElementById("myBalance").innerText = web3.fromWei(web3.eth.getBalance(web3.eth.accounts[0]), "ether");
}
</script>
</head>
<body>

<h1>This is my balance</h1>
<button onclick="getBalance()">Update my balance</button>
<span id="myBalance"></span> in Ether
</body>
</html>

Understanding this layer is important because it provides a frame of reference for programmatically engaging the blockchain and once you get the “hello world” application working, it is pretty much all downhill. I would have gone much deeper this weekend, but we got a puppy.

Source: https://www.udemy.com/blockchain-developer/

Sunday, September 24, 2017

Sending Transactions in a private Ethereum Blockchain Network - Lou Person

Sending Transactions in a private Ethereum Blockchain Network - Lou Person

There are many ways to send transactions across a Blockchain network.  This post discusses how it is done using basic methods, such as sending from a software wallet and using send transactions from the command line.  These methods are essentially equivalent to “Hello World” applications to prove out that all pieces of the stack are successfully installed and properly communicating.  Transactions can also be sent programmatically through contracts written in Solidity on the Ethereum network, but that will be a later post. 

There are a few components to a distributed Blockchain system that enable transactions to be passed between accounts participating in the Blockchain. The components are:
  • The network itself. I have been using Ethereum primarily. You can create accounts on the network before the Blockchain is launched. A network can be private, where a node has to be invited in, or Public, where anyone can attach.
  • The Blockchain. A blockchain is initialized, or launched, on the network. A genesis.json file describes the Blockchain and currency can be allocated to accounts on launch if the account id is known.
  • Nodes. When a node is launched, it will download all the Blocks previously created on the Blockchain.
  • Accounts. An account contains an ID, cryptography key and a password. Wallets are developed around the accounts to make them easier to manage, as well as send transactions directly or through contracts.
  • Contracts. Contracts are created programmatically and used to transact within the network, between accounts. The Ethereum network uses Solidity as the programming environment.
  • Cryptocurrency. When a Blockchain is launched, accounts can be allocated currency. Alternatively, cryptocurrency can be mined on the network through an attached node and allocated to an account was successfully mined. In the Ethereum network, the currency are Ethers.
Here are some scenarios to piece all of this together: 

Created a 3 node Ethereum network
A 3 node Ethereum network was created, read more about it here: http://blog.louperson.com/2017/09/created-3-node-private-ethereum.html

Launch an Ubuntu Server on AWS, open the requisite ports and install putty
AWS makes all of this so easy, and frankly, if it wasn’t for the evolution of AWS as a Public Cloud provider, Blockchains would be much less credible. Blockchain requires always on, highly available and distributed computing resources. Using AWS to host Blockchain (in this case Ethereum nodes) provides a highly reliable, infinitely scalable, fully distributed, secure and cost effective platform. A few quick notes on AWS (most importantly the ports that are needed in the security group):

Create a root account and protect it with a hardware based MFA.
Create IAM accounts and enable soft MFA, try to work out of the IAM accounts and not root.
Create a Security Group, give it a meaningful name such as Blockchain, and make sure these inbound ports are open:
  • 30303, 35376, 30333 – Blockchain peering protocol (probably only 1 is needed if there is consistency when launching nodes) 
  • 22 – SSH 
  • 8545 – Used by Wallets and Contracts to talk to the nodes for account information 
At the time of writing, this Amazon Machine Image (AMI) was ideal: Ubuntu Server 16.04 LTS (HVM), SSD Volume Type - ami-6e1a0117
Select the Instance Type. The t2.micro free Tier should be fine, it can always be scaled up later, part of the beauty of AWS.
Select defaults under Instance details.
Create one volume of 30GB. General purpose SSD is fine.
Add tags as needed for administration, automation and reporting purposes, or leave blank.
Add the instance to the Security Group previously configured.
Review and launch.
Create an Elastic IP and assign it to the EC2 instance that was just launched.
Use an existing key pair or create a new one, but make sure it is downloaded and saved because it is required when connecting to the server. The .pem file is required to be downloaded before the server is launched.
Connect to the server using Putty or other ssh client, instructions for Putty here: http://docs.aws.amazon.com/AWSEC2/latest/UserGuide/putty.html
Install the following on the server:
  • sudo apt-get install software-properties-common 
  • sudo add-apt-repository -y ppa:ethereum/ethereum 
  • sudo apt-get update 
  • sudo apt-get install ethereum
Create the Genesis.json file and initialize the node
It’s best to keep this file as simple as possible.  Use the alloc statement to allocate ethers to a few accounts initially, but this isn’t necessary, in fact, it adds complexity to the Genesis.json file.
{
    "config": {
        "chainId": 15,
        "homesteadBlock": 0,
        "eip155Block": 0,
        "eip158Block": 0
    },
    "nonce": "0x0000000000000042",
    "mixhash": "0x0000000000000000000000000000000000000000000000000000000000000000",
    "difficulty": "0x4000",
    "alloc": {},
    "coinbase": "0x0000000000000000000000000000000000000000",
    "timestamp": "0x00",
    "parentHash": "0x0000000000000000000000000000000000000000000000000000000000000000",
    "gasLimit": "0xffffffff",
    "alloc": {
        "aba11d916475e---------a9b916----97b9508e": { "balance": "20000000000000000000" },
        "31e3575b7----------29634fb8053----02fbbab": { "balance": "40000000000000000000" },
        "c5f995a---------0a9f20db650fb142----e698": { "balance": "40000000000000000000" }

    }
}
Initialize the node: $geth init Genesis.json

Create a shell file to launch the network with this command:
nohup geth -rpc --rpcaddr "0.0.0.0" --rpcapi personal,web3,eth --networkid 23 --nodiscover --maxpeers 10  --port 30303 &
Call the file rungeth.sh and did a chmod 775 rungeth.sh on it so it is executable as  .\rungeth.sh
Use the following command to list all the accounts in the network, of which there were none at launch:
geth account list rpc:http://localhost:8545

Create accounts directly on the primary node using Mist
Install mist on the client-side machine.  By doing so, the entire Blockchain doesn’t need to be downloaded directly, which saved space.  Also, any mining work will be done on the remote server on which the node is running, so much thinner hardware can be used on the client side.
Then, connect to the main node:
mist --rpc http://54.68.50.219:8545 --swarmurl=http://swarm-gateways.net
Once attached, hit the Add Account button, create the account and give it a password.  Add a few accounts for experimentation purposes in the sections below.  The key will be stored on the server side.  Once the account is created, list the accounts and the new account will appear (this command is not sent through the geth console):
$ geth account list rpc:http://localhost:8545
Account #0: {aba11d916475e48----------91640d997b9508e} keystore:///home/ubuntu/.ethereum/keystore/UTC--2017-09-22T19-43-46.697950494Z--aba11d916475e4----------640d997b9508e
Account #1: {f201d1ac0ec3a64f82e9----------93c1890} keystore:///home/ubuntu/.ethereum/keystore/UTC--2017-09-23T15-16-18.421518845Z--f201d----------f82e9a54c11d6ffb9f93c1890
Account #2: {3bd8646cc9----------f8812d670ea607687a05} keystore:///home/ubuntu/.ethereum/keystore/UTC--2017-09-23T22-24-57.228977892Z--3bd86----------52063f8812d670ea607687a05
This also lists accounts from the geth console: >eth.accounts

Mine Ethers into the account
With geth running in the background, attach to the console:
$geth attach
Set the account that you want to mine into referencing the account list above:
> miner.setEtherbase(eth.accounts[1])
Launch the miner:
>miner.start(10)
Note that 10 is the number of threads that will be used for mining, another benefit of working with AWS so the requisite processing is available.
After sufficient Ethers are added to the account, about 1000, switch wallets:
> miner.setEtherbase(eth.accounts[2])
When done, stop the miner:
>miner.stop()

Ethers will now appear in the account on the Mist wallet.  For the other sections below, add Ethers to all the accounts created.

Checking account balances
The following command is used to check balances of the accounts.  The number after eth.accounts represents the number of the account for which the balance is being queried:
> balance = web3.fromWei(eth.getBalance(eth.accounts[0]), "ether");

Send Transactions using Mist
In the Mist wallet, select one of the accounts that Ethers will be sent from, enter an account that Ethers will be sent to.  Using the account list above, this example used this account:
3bd8646cc9----------f8812d670ea607687a05
Enter an amount.
Hit send.

On the geth console on the server, view the pending transaction:
>eth.pendingTransactions
Here is what the pending transaction will look like:
[{
    blockHash: null,
    blockNumber: null,
    from: "0xaba11d916475e48----------91640d997b9508e",
    gas: 121001,
    gasPrice: 18000000000,
    hash: "0x21c8720e4ec5885---------------4f1e33870f3db0576ede88bea50529d96d",
    input: "0x",
    nonce: 2,
    r: "0xe0ad06721af4be89e87239---------------31b3e9cb2c9abf07dde41e7cd9c",
    s: "0x7cadeb998790304009fb---------------0f25178df8f4c008f139cedd3dddc",
    to: "0x3bd8646cc9----------f8812d670ea607687a05", transactionIndex: 0,
    v: "0x41",
    value: 200000000000000000000
}]
Enter this command to post the transactions: 
> miner.start();admin.sleepBlocks(1);miner.stop();

The pending transaction queue will go to null and the Ethers will be transferred between wallets.
Check the account balances using:
> balance = web3.fromWei(eth.getBalance(eth.accounts[0]), "ether");
> balance = web3.fromWei(eth.getBalance(eth.accounts[2]), "ether");

Send Transactions using the SendTransaction command
From the geth console, use the SendTransaction command to send Ethers between two accounts as follows:
First, unlock the seconding account:
personal.unlockAccount("'aba11d916475e48----------91640d997b9508e'")

Then, send the transaction.
>eth.sendTransaction({from: '0xaba11d916475e48----------91640d997b9508e', to: ' f201d1ac0ec3a64f82e9----------93c1890', value: web3.toWei(23, "ether")})

Check it is pending: >eth.pendingTransactions
This command is needed to execute the transaction:
> miner.start();admin.sleepBlocks(1);miner.stop();

Adding a node to the Blockchain
On the first node, run this command from the geth console to get the node information:
>admin.nodeInfo.enode
Copy and paste what is returned, changing the [::] to the public IP address of the server.

To add an independent node to the Blockchain, launch geth on the second server and then run this command, replacing the text after enode:// and the IP address with the correct values of the real environment, sample data is used:

admin.addPeer("enode:// be89ed26d4bc95e2bf7e388a8ec--------------------7f8b5ef80a2bb7e62dd2de6dd03d8cff6609570eb--------------------1bf404ca1ae3659f0149@54.22.33.169:35376?discport=0")
Wait a few seconds, then on both servers run
>net.peerCount
and each should return 1 indicating the nodes are connected.

Launching another node into the network using a Bootloader
Setup another server per the instructions above and initialize it using the same Genesis.json file.
On the first node, run this command from the geth console to get the node information:
>admin.nodeInfo.enode
Copy and paste what is returned, changing the [::] to the public IP address of the server.
On the main server, enter this:
>net.peerCount which should return 0 because the second node is connected yet.
On the second node, launch geth by attaching to the Bootloader as follows:
geth  --networkid 23 --bootnodes enode://be89ed26d4bc95e2bf7e388a8ec--------------------7f8b5ef80a2bb7e62dd2de6dd03d8cff6609570eb--------------------1bf404ca1ae3659f0149@54.22.33.169:30303 console

Wait a few seconds, then on both servers run
>net.peerCount
and each should return 1 indicating the nodes are connected.

Create a new account on the second node:
>personal.newAccount()

On the second node, list the accounts to confirm the account was created
> eth.accounts
["0x6fd643e5------------5ec78423be-----0f9d4"]

On the second node, list the balance of the account, it should be 0 because it was just created:
> balance = web3.fromWei(eth.getBalance(eth.accounts[0]), "ether");

With the two nodes created, send a transaction from the from an account on the first node to the account on the second node.  The account on the second node will not be visible directly on the first node, it needs to be explicitly entered.  This is due to the second node managing the keystore of the accounts associated with that node.  However, since the two nodes are connected, transactions can be sent between them.
>eth.sendTransaction({from: 'aba11d916475e48----------91640d997b9508e ', to: '0x6fd643e5------------5ec78423be-----0f9d4', value: web3.toWei(500, "ether")})

List pending transactions:
> eth.pendingTransactions

On the first node, post the transaction:
>miner.start();admin.sleepBlocks(1);miner.stop();

On the second node, check the balance and the ethers should have posted across the nodes:
> balance = web3.fromWei(eth.getBalance(eth.accounts[0]), "ether");
500

What comes next
Later posts will describe how to post transactions using programmatic contracts, as well as what is happening behind the scenes, such as authorizations from all nodes on the Blockchain.


Friday, September 22, 2017

Created 3 node private Ethereum Blockchain network - Lou Person

Created 3 node private Ethereum Blockchain network

So far this weekend, I created a 3 node private Ethereum Blockchain network using AWS Ubuntu servers. Each server was independent of the other and distributed in regions around the world. There are still many aspects of Blockchain that remain a mystery, but the deeper I go, the more I learn and the more fascinating it becomes. The first thing I did was create a security group in the AWS console for the requisite ports:


Then, I launched the 3 servers, calling them server1, server2 and server3. Server1 will be used as the main node. Then, I logged into each server and installed Ethereum:  Instructions for using putty to connect to AWS launched server: http://docs.aws.amazon.com/AWSEC2/latest/UserGuide/putty.html
sudo apt-get install software-properties-common 
sudo add-apt-repository -y ppa:ethereum/ethereum 
sudo apt-get update
sudo apt-get install ethereum

On each server, before launching the Ethereum Blockchain, I created an account and noted the GUID for the account. This account ID will need to be entered in the genesis.json file when the Blockchain is initialized. This is one of those rudimentary items because each time a node is entered, it will need the same genesis.json file and each node will need to be reset with the new genesis file. I'll figure out how to make the private Blockchain more scaleable and work around this at a later time.  It actually turns out that these accounts are only needed to allocate ether to them when the Blockchain is initialized.  If the alloc statement isn't in the genesis file, you can still mine directly to those accounts.

I ran this command on each of the servers: 
geth account new
I had to enter a password for the account and then geth returned an address which I noted down for each of the three servers. This is what the genesis.json file looks like, note the alloc section where each account is listed and the initial allocation of Ethers (the crypto currency associated with Ethereum):


I created this file on each of the three nodes.
Next, the Ethereum Blockchain was initialized on each node by executing the following:
geth init Genesis.json
On server1, the main node, I launched the Blockchain through this command:
geth --networkid 23 --nodiscover --maxpeers 2 --port 30333 console

Since this is the main node, the nodeinfo is needed so it can be referenced in the other nodes, this command provided it:
> admin.nodeInfo.enode
The following was returned:
"enode://442f61b352151b4dfeb78ab01a2318v1255c9fb49ac9aedc22485f7c1aca8cc638540833e4577016f9a6180d1e911d907280af9b3892c53120e1e30619594eba@[::]:30333?discport=0"

I replaced the [::] with the IP of the server and saved it in the ./ethereum directory in the file:static-nodes.json. This file tells the node where to find the main node.

Next, I started the other two nodes on server2 and server3:
geth --networkid 23 --nodiscover --maxpeers 1 --port 30333 console
I checked that the balance matched what was set in the genesis.json file as follows:
balance = web3.fromWei(eth.getBalance(eth.accounts[0]), "ether");
and then mined 5 ethers:
miner.start();admin.sleepBlocks(1);miner.stop();
It was really exciting when I saw that I had 2 peers connecting to the main node by running:
> net.peerCount
Finally, I sent a transaction from one node to another.
I unlocked the sending node (server1):
> personal.unlockAccount(aba11d-----5e48fb33632a9b9--------b9508e')
Then sent the actual transaction across the Blockchain:
> eth.sendTransaction({from: 'aba11d-----5e48fb33632a9b9--------b9508e', to: '3--------11058759329634fb8053--------bab', value: web3.toWei(23, "ether")})

This command showed the pending transaction:
> eth.pendingTransactions
On the receiving node, the miner was started to post the transaction:
> miner.start(1);admin.sleepBlocks(1);miner.stop();
Checking the balance on the second node showed that it increased by the amount of the transaction and checking the balance of the first node, it decremented by the same.
Next, I'm going to setup a boot node in order to make this much more scaleable and automated.